The marine environment is brutally unforgiving to electrical systems. Between constant vibration, high humidity, and the omnipresent threat of saltwater corrosion, a subpar electrical connection will fail—it is not a matter of if, but when. On a boat, a failed heavy-gauge connection can mean a lost bilge pump, a dead engine, or in the worst-case scenario, an electrical fire.
When plumbing heavy DC loads like windlasses, inverter banks, or trolling motors, 4 AWG (American Wire Gauge) cable is a standard workhorse. To ensure these high-current paths remain safe and efficient, you must know how to properly terminate them.
Here is a comprehensive guide to flawlessly crimping a 4 awg tinned lug to ensure your vessel’s electrical system remains bulletproof for years to come.
Why Materials Matter: The Anatomy of a Marine Termination
Before picking up any tools, you must understand why standard automotive components have no place on a boat.
1. The Cable: Type III Marine Grade
Marine-grade 4 AWG wire consists of individual copper strands that are individually tinned. This tin plating prevents the copper from oxidizing and turning into a green, non-conductive powder. Furthermore, Type III marine wire features a high strand count for maximum flexibility to withstand constant hull vibrations without fracturing.
2. The Lug: Heavy-Duty Tinned Copper
Your choice of a 4 gauge tinned lug is critical. A proper marine lug is manufactured from pure, seamless copper that has been electro-tinned.
- Closed-End Design: Ensure the lug features a solid, closed end rather than an open barrel. A closed-end design prevents water from wicking up into the wire strands from the tongue side.
- Heavy Wall Thickness: High-quality lugs have noticeably thicker walls to handle the massive mechanical pressure of a proper crimping tool without cracking.
The Essential Toolkit
To achieve a termination that meets American Boat and Yacht Council (ABYC) standards, you need the right tools. Do not attempt to use a hammer, a chisel, or standard locking pliers.
- Cable Cutters: Shearing-type cutters designed for heavy-gauge wire to prevent flattening the cable profile.
- Wire Strippers: A razor knife or specialized rotary wire stripper.
- Heavy-Duty Crimping Tool: A ratcheting hex-die crimper or a compound-lever mechanical crimper. (A hydraulic crimper is also an excellent choice for 4 AWG).
- Adhesive-Lined Heat Shrink Tubing: Dual-wall polyolefin tubing with a 3:1 or 4:1 shrink ratio.
- Heat Gun: For activating the heat shrink adhesive.
Step-by-Step Guide to the Perfect Crimp
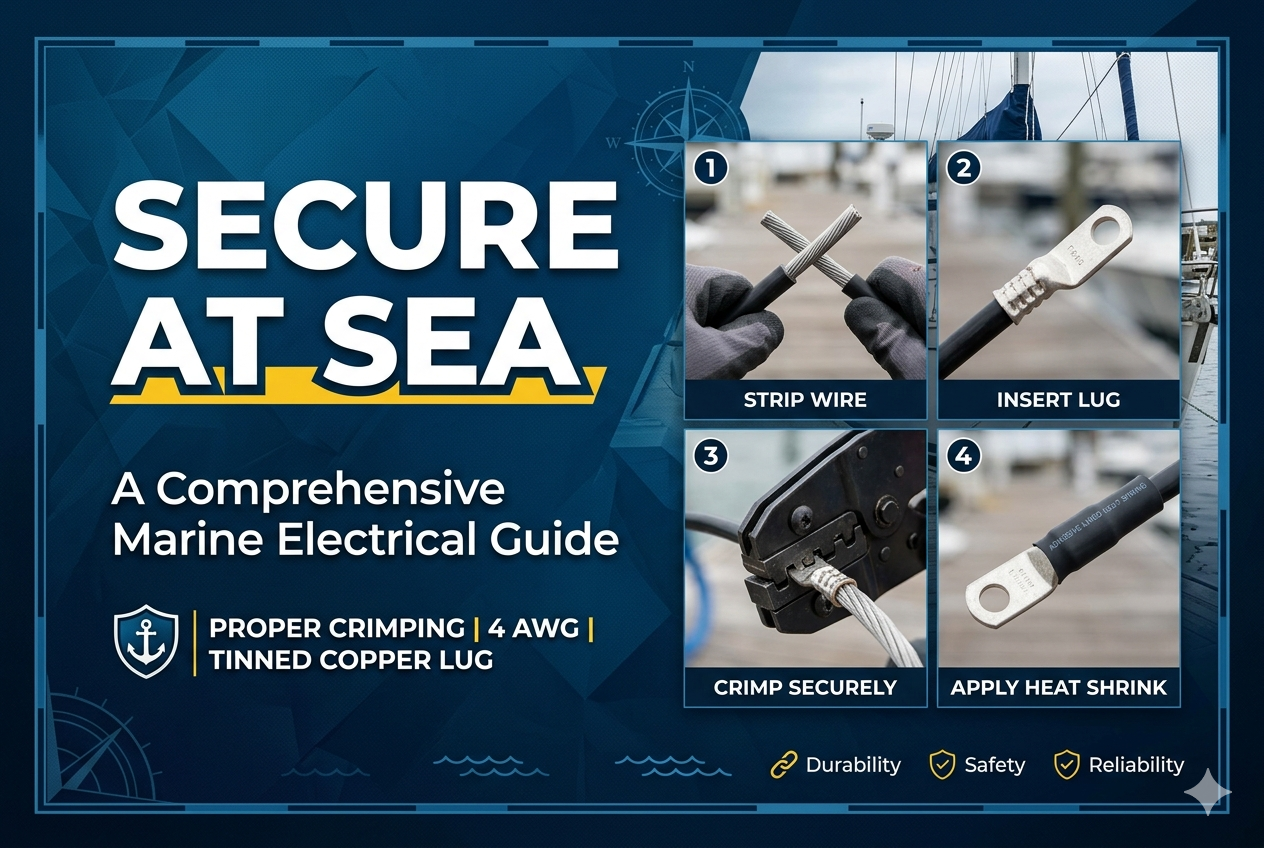
Step 1: Prep and Cut the Cable
Begin by cutting your 4 AWG cable squarely using your cable cutters. A clean, perpendicular cut ensures that all individual wire strands will seat evenly inside the barrel of your 4 gauge tinned lug. Inspect the cut end to ensure the strands are tightly bunched and not splayed out.
Step 2: Strip the Insulation
You must strip exactly enough insulation to match the depth of the lug’s barrel, plus a tiny margin—roughly 1/16 of an inch ($~1.5 \text{ mm}$).
- Slide the wire into the lug barrel to visually gauge the depth.
- Carefully cut the insulation using a rotary stripper or razor knife. Be incredibly cautious not to nick, cut, or scrape any of the individual tinned copper strands. Damaging the strands reduces the current-carrying capacity of the wire.
- Twist the insulation off smoothly to keep the strands tightly wound.
Step 3: Dry Fit and Prep Heat Shrink
Before doing anything else, cut a 1.5 to 2-inch piece of adhesive-lined heat shrink tubing and slide it onto the cable. Forgetting this step is the most common mistake in electrical termination, forcing you to cut off a perfectly good crimp later.
Next, dry-fit the 4 awg tinned lug onto the bare wire. The strands should slide smoothly into the barrel without bunching up or escaping outside the rim. The insulation should butt up flush against the back of the lug barrel.
Step 4: Execute the Crimp
This is the most critical phase. Marine electrical standards require a cold-weld crimp. When properly compressed, the air gaps between the wire strands and the lug barrel are completely eliminated, fusing them into a solid block of metal.
- Select the Die: Set your crimping tool to the correct die size for 4 AWG.
- Position the Lug: Insert the lug into the crimper dies. If you are using a single-indent or hex-die tool, the crimp should be centered on the barrel, slightly away from the inspection hole and the flared entry rim.
- Orient the Tongue: Ensure the flat tongue of the lug is oriented in the direction it needs to face when bolted down to your busbar or battery switch. You cannot easily twist a 4 AWG wire once it is crimped.
- Compress Fully: Squeeze the crimper until the cycle completes. If using a ratcheting or hydraulic tool, it will not release until the proper mechanical pressure has been reached.
Pro-Tip: A perfect hex crimp will leave minimal “flashing” (wings of metal squeezed out of the sides). If you notice massive wings, your die size may be too small, or the lug wall thickness is out of spec.
Step 5: Environmental Environmental Sealing (The Secret Sauce)
Even a perfect mechanical crimp can fail if moisture creeps in over time. Slide your pre-positioned adhesive-lined heat shrink tubing up over the wire insulation, completely covering the crimped barrel of the lug. It should stop right where the barrel transitions into the flat tongue.
Using a heat gun, apply even heat starting from the center of the tubing and moving outward to prevent trapping air bubbles. Keep the heat gun moving to avoid scorching the plastic. You will see the tubing shrink tightly around the contours of the lug and wire.
The ultimate indicator of success: A thin, uniform bead of melted adhesive sealant should ooze out of both ends of the heat shrink tubing. This creates a completely hermetic, waterproof seal that isolates the copper from the corrosive salt air.
Verifying Your Work: The Quality Checklist
Before installing your newly terminated cable onto your boat, perform a quick quality control inspection:
| Checkpoint | What to Look For |
|---|---|
| The Pull Test | Give the lug a firm, aggressive tug. There should be absolutely zero movement or slippage between the cable and the lug. |
| The Seal | Verify that the adhesive glue has completely ringed the wire insulation and the base of the lug tongue. |
| The Profile | Ensure the heat shrink isn’t split or charred, and that no stray copper strands are poking out from the back of the barrel. |
Conclusion
Terminating heavy-gauge DC wiring for a boat isn’t just about functionality—it is about safety. By using a high-quality 4 awg tinned lug, employing the correct mechanical crimping tools, and sealing the joint with adhesive-lined heat shrink, you create a connection that mimics a solid piece of metal. It will easily withstand the relentless pounding of heavy seas and the corrosive sting of the ocean, keeping your boat’s systems humming safely for years to come.